Managing Meeting Assistant Account Settings
The Meeting Assistant provides sales teams with the ability to record, transcribe, and analyze conversations within Zoom and Google Meet while delivering real-time coaching insights through Moments™ notifications. As an admin, you can configure the Meeting Assistant’s behavior, recording controls, and branding to align with your organization’s preferences.
This article outlines the available account-level settings that can be managed within the Revenue Admin Console to personalize and control how the Meeting Assistant functions across your team’s meetings.
To manage your Meeting Assistant, please navigate to the Meeting Assistant section under Integrations within the Revenue admin console.
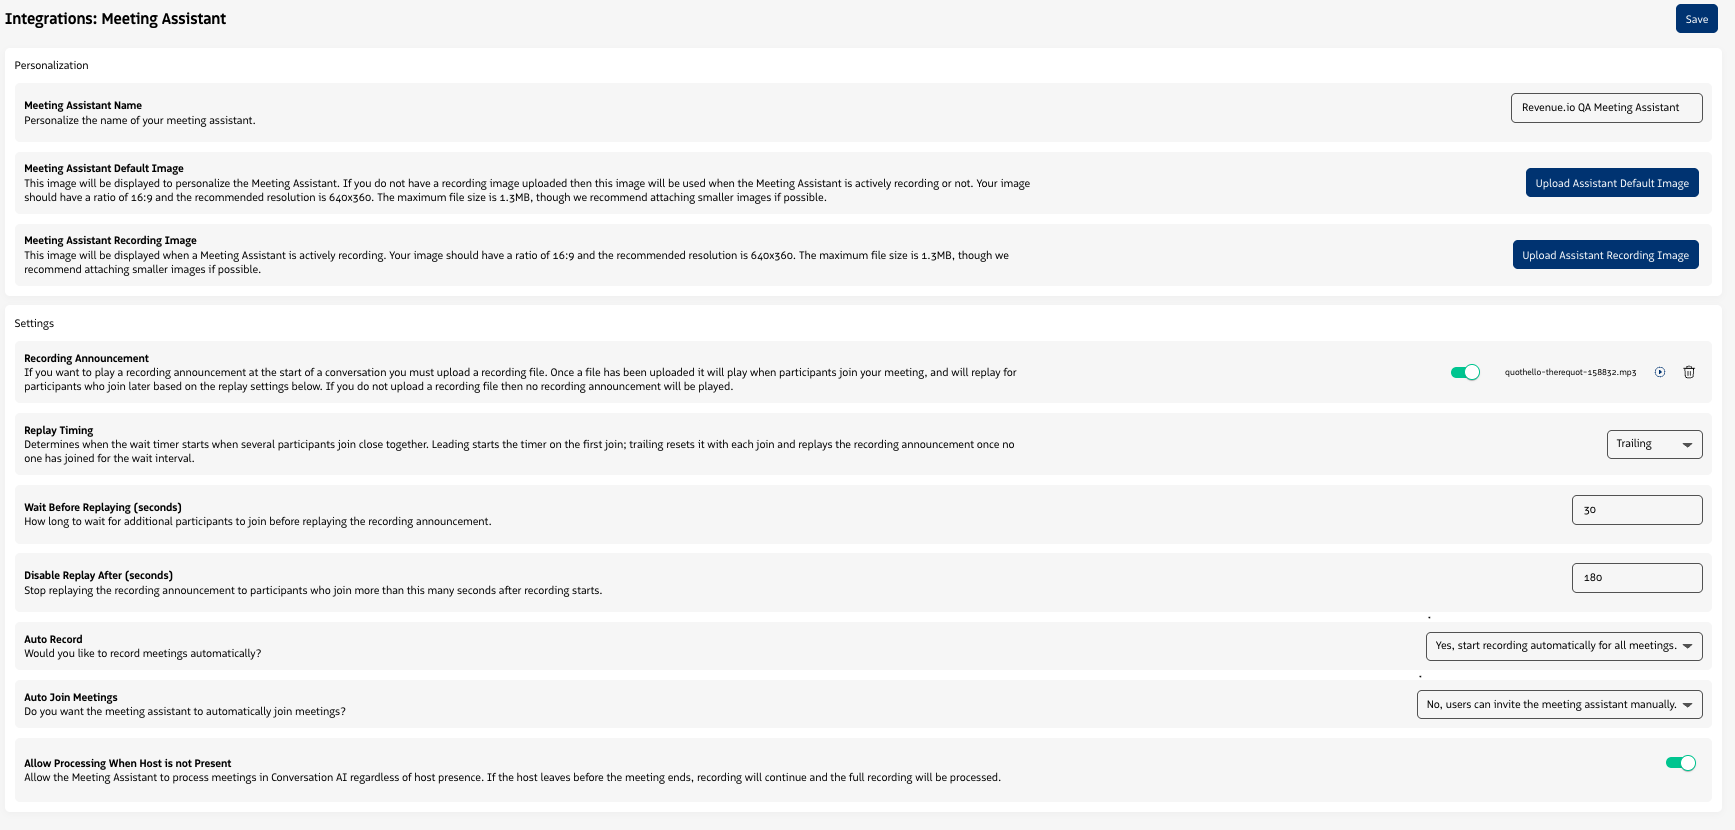
Meeting Assistant settings in Admin
Personalizing the Meeting Assistant
Admins can customize the appearance and identity of the Meeting Assistant to match company branding or user preferences.
Name the Meeting Assistant
By default, the name of your Meeting assistant will be “Revenue.io Meeting Assistant.” You can customize the display name of the Meeting Assistant (e.g., “Acme Meeting Assistant”) to match your company branding.
How to configure the name of the Meeting Assistant:
- Locate the Personalization section.
- Update the Meeting Assistant Name as needed
- Click Save to apply changes.
If you wish to delete a previously added image, select the trash can icon in line with your file name to remove the file to upload a new image.
Adding a Default Image
To further personalize your Meeting Assistant you can upload a custom logo or avatar for the Meeting Assistant’s participant card in meetings.
- Locate the Personalization section.
- Click on the “Upload Assistant Default Image” Button
- Select a supported image from your device’s file picker. Your image should have a ratio of 16:9 and the recommended resolution is 640x360. The maximum file size is 1.3MB, though we recommend attaching smaller images if possible.
- Select the “Open” button to add the file
- You will receive a success message designating that your file has been uploaded successfully.
- You will be able to view the file name of the chosen file within the section.
Now that you have a recording image in place, each time a Meeting Assistant joins your meetings based on your configuration the image will be presented within the participant card of the Meeting Assistant.
If you wish to delete a previously added default image, select the trash can icon in line with your file name to remove the file to upload a new image.
Adding a Recording Image
You can also add a custom image to the Meeting Assistant that is presented when it is actively recording a conversation. If you do not have a recording image uploaded then your default image will be used when the Meeting Assistant is actively recording or not given you have uploaded a default image.
To upload a recording image, follow the same steps as managing a default image:
- Locate the Personalization section.
- Click on the “Upload Assistant Recording Image” button
- Select a supported image from your device’s file picker. Your image should have a ratio of 16:9 and the recommended resolution is 640x360. The maximum file size is 1.3MB, though we recommend attaching smaller images if possible.
- Select the “Open” button to add the file
- You will receive a success message designating that your file has been uploaded successfully.
- You will be able to view the file name of the chosen file within the section.
If you wish to delete a previously added recording image, select the trash can icon in line with your file name to remove the file to upload a new image.
Meeting Assistant Settings
Recording Announcements
If you want to play a recording announcement at the start of a conversation you must upload a recording file to play during a conversation. Once a file has been uploaded then you can configure how often it will be played as participants join the meeting. If you do not upload a recording file then no recording announcement will be played.
Uploading a Recording Announcement file
- Locate the Settings section.
- Select the “Browse” button in line with the Recording Announcement Setting
- Select a supported file from your file picker. You can upload a .mp3 file no more than 1.3 MB
- Click on the “Open” button to add the file
- You will receive a success message designating that your file has been uploaded successfully.
- You will be able to view the file name of the chosen file within the section.
Once you have uploaded a Recording Announcement, by default it will not be played until you have enabled the recording Announcement Toggle. With a recording announcement uploaded the toggle will be enabled.
Enable the toggle to ensure the announcement will play in your meetings, and to configure the replay logic.
If you wish to delete a previously added recording announcement, select the trash can icon in line with your file name to remove the file to upload a new image.
Recording announcement replay
When a recording announcement is enabled, it will play as soon as the Meeting Assistant joins a meeting. You can then configure when it replays as participants join your meeting to ensure everyone has heard the announcement.
- Replay Timing (Default = Trailing) - Determines when the wait timer starts when several participants join close together. Leading starts the timer on the first join; trailing resets it with each join and replays the recording announcement once no one has joined for the wait interval.
- Wait Before Replaying (Default = 30 seconds) - Determines how long to wait for additional participants to join before replaying the recording announcement.
- Disable Replay After (Default = 180 seconds) - Stop replaying the recording announcement to participants who join more than this many seconds after recording starts. This value has to be higher than Wait Before Replaying value.
Auto Recording
You can manage if you want the Meeting Assistant to automatically record once it joins a meeting or if you want your reps to manually start recording. By default, the setting will be set to “Yes, start recording automatically for all meetings.”
You can update this setting to “No, start recording manually” if you want your reps to have to manually select the start recording button to initiate a recording.
To make a chance to this setting, simply select from the picklist dropdown and select the “Save” button.
Controlling When the Meeting Assistant Joins Meetings
You can manage if you want the Meeting Assistant to automatically join meetings that Revenue detects or if reps should only invite the Meeting Assistant manually to select meetings.
By default, the setting will be set to “Yes, Automatically join when a user is the Host.” When this is selected, any meeting with a detected Google Meet or Zoom join URL will have the Meeting Assistant attempt to join.
You can also set the auto join setting to “No, users can invite the meeting assistant manually.” When this is selected, a user can use the Moments™ application to manually invite the meeting assistant to the meeting for Google Meets conversations.
Note: The auto-join feature requires calendar integration (Google or Outlook). If a meeting is created instantly and is not detected in the calendar, the Meeting Assistant must be manually invited. There is currently also no way to manually invite the Meeting Assistant to a Zoom meeting.
Recording When Host is Not Present
If the “Recording When Host is Not Present” setting is turned OFF, the Meeting Assistant can record the meeting, but it will not be ingested into Conversation AI for analysis.
If the “Recording When Host is Not Present” setting is turned ON, the Meeting Assistant will record the meeting and it will be ingested into Conversation AI for analysis, regardless of whether the host is in the meeting.
This can be helpful in cases where the host is unable to attend the meeting, but the rest of the meeting attendees still have the meeting, and you want the full meeting to be recorded and retrievable in Conversation AI. If the host joins the meeting and then drops, the meeting recording will be paused.